
Purpose of an ESL Newcomer Packet

Designed to welcome ELL newcomers, the packet offers low‑prep, WIDA‑aligned worksheets and independent lessons that build foundational English skills. It introduces key vocabulary, cultural norms, and classroom expectations, ensuring students feel confident and connected from day one. Students thrive.
Definition and Goals
In the context of English as a Second Language instruction, an ESL newcomer packet is a curated, ready‑to‑use resource bundle that introduces students who have recently arrived to the school community. It typically contains a mix of WIDA‑aligned worksheets, interactive activities, visual aids, and digital links that address the four core language domains—listening, speaking, reading, and writing. The primary goal is to scaffold the transition from a non‑English environment to an English‑medium classroom by providing clear, culturally responsive materials that align with state and district standards. A secondary goal is to empower teachers to deliver consistent, high‑quality lessons without extensive preparation time, thereby ensuring that every newcomer receives equitable access to curriculum from the first day. The packet also serves as a diagnostic tool, offering quick assessments that help educators identify individual strengths and gaps, enabling targeted intervention. Finally, it fosters community integration by including orientation content that explains school norms, safety procedures, and available support services, helping students feel welcomed and confident in their new setting. Moreover, the packet is designed to be culturally inclusive, featuring multilingual glossaries, diverse imagery, and context‑rich scenarios that reflect the varied backgrounds of learners, thereby promoting engagement, reducing anxiety, and fostering a sense of belonging from the outset. in welcoming environment.

Core Components of the Packet
Each packet blends WIDA‑aligned worksheets, interactive picture cards, digital labs, and quick‑start guides. It covers listening, speaking, reading, and writing, plus cultural orientation and assessment tools to track progress and personalize support for learning
WIDA-Aligned Worksheets and Activities

These resources are crafted to meet the WIDA standards for English language development, providing clear, scaffolded tasks that target all four language domains. The packet includes printable PDF worksheets that can be distributed in paper form or accessed digitally, ensuring accessibility for every learner. Each worksheet is designed with low‑prep, engaging prompts that encourage independent practice while still allowing for teacher‑guided instruction. Activities range from matching vocabulary to context clues, sentence construction exercises, and short listening comprehension tasks that reinforce listening and speaking skills. The materials incorporate culturally relevant images and scenarios, helping students connect new language concepts to familiar experiences. Teachers can easily adapt the worksheets to fit the specific proficiency levels of their class, using the built‑in response keys for quick assessment. The included activities also support formative assessment, allowing educators to track progress and adjust instruction in real time. By integrating WIDA‑aligned content, the packet ensures that newcomers receive consistent, standards‑based support as they build confidence in using English across all contexts.
These worksheets also feature answer keys and suggested teacher notes, enabling quick feedback loops. The PDF format supports printing, annotation, and digital sharing, making the packet versatile for remote or in‑class use. By aligning with WIDA benchmarks, educators can confidently scaffold lessons that meet diverse learner needs. Students can download and print.
Four Language Domains Covered
Our ESL newcomer packet PDF offers targeted support across listening, speaking, reading, and writing. Each domain features WIDA‑aligned activities, interactive digital centers, and printable worksheets that build confidence and fluency for new English learners!

Listening, Speaking, Reading, Writing Resources
In the ESL newcomer packet PDF, each domain is supported by curated, WIDA‑aligned materials that enable rapid skill acquisition. For listening, students engage with short, authentic audio clips—dialogues, news snippets, and cultural vignettes—paired with guided questions that target comprehension, inference, and note‑taking. Speaking activities include role‑plays, picture‑prompt conversations, and pronunciation drills that emphasize stress, intonation, and everyday expressions. Reading resources feature graded texts, informational passages, and interactive graphic organizers that scaffold vocabulary, main idea extraction, and critical thinking. Writing prompts range from sentence‑building exercises to paragraph composition, encouraging use of cohesive devices, varied syntax, and appropriate register. Each activity is accompanied by clear success criteria, self‑check checklists, and optional digital extensions such as voice‑recording tools or collaborative document editors. The packet’s design ensures that newcomers can practice each skill independently, while teachers can monitor progress through embedded rubrics and quick‑scan markers. By integrating these resources, the packet supports a holistic, student‑centered approach that aligns with WIDA standards and promotes confidence in real‑world communication. Teachers can also provide feedback loops, allowing students to reflect on their progress and adjust strategies, ensuring continuous growth and language mastery. Additionally, the packet offers PDFs, worksheets, and audio files!!

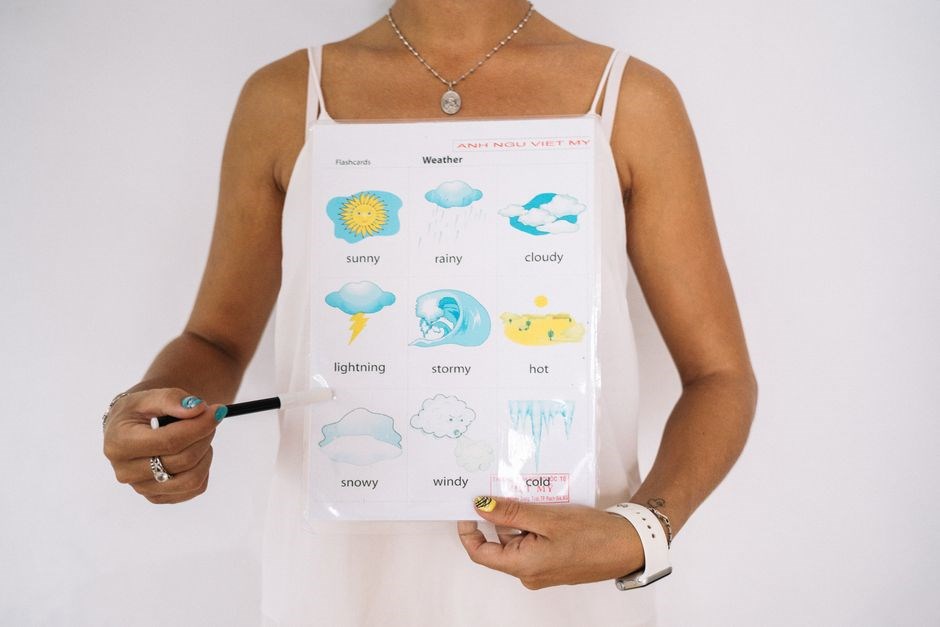
Visual and Interactive Materials
Students explore picture cards, digital labs, and games that reinforce vocabulary and cultural context. The packet offers printable flashcards, clickable quizzes, and prompts, enabling hands‑on practice and immediate feedback for all skill levels. quick review.
ESL Picture Cards and Interactive Digital Centers
Picture cards and digital centers form the visual core of the newcomer packet. Each card shows a clear, high‑resolution image paired with a short, WIDA‑aligned sentence that introduces essential vocabulary and grammatical patterns. Cards are organized by theme—food, transportation, family, school, community—so teachers can scaffold lessons around familiar contexts.
Interactive digital centers complement the print set with clickable activities, short videos, and audio prompts that reinforce the same concepts. Students drag words to complete sentences, match pictures to definitions, or record their voice to practice pronunciation. Adaptive quizzes provide instant feedback and track progress over time.
Teachers use cards in morning routines, group discussions, or exit tickets. A “card of the day” sparks conversation, while a digital activity serves as a formative assessment before a lesson. Parents can access the digital hub from home, ensuring continuity between school and family life. The packet follows universal design for learning principles, offering text alternatives, adjustable font sizes, and color‑blind friendly palettes. This accessibility guarantees that every student, regardless of visual or auditory challenges, can participate fully. The blend of tactile and digital resources creates a seamless learning ecosystem that adapts to diverse learning styles and paces.

Assessment and Progress Tracking
Online lab quizzes, listening labs, and WIDA‑aligned checklists enable teachers to monitor skill growth. Data dashboards display individual scores, trend lines, and mastery levels, allowing timely interventions and personalized feedback for each newcomer!!!
Online Lab Quizzes and Listening Labs
Online lab quizzes and listening labs are integral components of the ESL newcomer packet PDF, offering dynamic, interactive assessments that mirror real‑world English usage. These digital tools provide instant feedback, allowing teachers to pinpoint strengths and gaps in listening comprehension, pronunciation, and receptive skills. Each quiz is WIDA‑aligned, ensuring that questions target specific language proficiency levels and address the four core domains—listening, speaking, reading, and writing—while focusing on the listening domain. Students engage with authentic audio clips, such as news reports, everyday conversations, and instructional dialogues, which are paired with multiple‑choice, fill‑in‑the‑blank, and short‑answer prompts. The labs also incorporate speech‑recognition technology, enabling learners to practice pronunciation and receive corrective cues. Data analytics dashboards track individual progress over time, displaying scores, completion rates, and mastery trends. Teachers can export reports to share with parents or use them to tailor subsequent lessons. The labs are accessible via web browsers and mobile devices, ensuring that learners can practice anytime, anywhere. By integrating these labs into the newcomer packet, schools foster self‑directed learning, boost confidence, and create a measurable pathway toward English proficiency. The PDF format preserves the lab links and instructions, allowing educators to distribute a cohesive, ready‑to‑use resource that aligns with curriculum standards and supports continuous assessment.
Teachers embed labs into plans, distributing PDF links. Students log in, complete quizzes, and receive instant analytics that guide remediation. Labs support pacing for daily skillall levels.

Customization for Individual Learners
Customizing the ESL newcomer packet PDF tailors content to each learner’s proficiency, interests, and cultural background. Teachers select targeted worksheets, adjust vocabulary difficulty, and add personalized goals. This approach boosts engagement, accelerates skill growth, and supports so fair learning.
Creating a Personalized Welcome Packet
Start by assessing each newcomer’s English level, cultural background, and learning preferences. Use a brief survey or informal interview to gather data on prior exposure to English, preferred learning styles, and any specific goals or challenges. Next, select WIDA‑aligned worksheets that match the identified proficiency range, ensuring that each activity targets the four language domains—listening, speaking, reading, and writing—while also incorporating culturally relevant themes. For visual support, add ESL picture cards that illustrate everyday scenarios and key vocabulary, and embed interactive digital centers where students can practice pronunciation, sentence structure, and comprehension through gamified quizzes. To personalize the packet, include a section with the student’s name, photo, and a short welcome message from the teacher, fostering a sense of belonging. Add a “Learning Path” outline that maps out weekly objectives, suggested independent resources, and checkpoints for progress reviews. Finally, provide a printable PDF version that can be distributed electronically or in hard copy, and link to an online platform where students can access additional materials, submit assignments, and receive feedback. By integrating these elements, the packet becomes a dynamic, student‑centered tool that supports smooth integration and accelerated language development.
Teachers can embed short video clips that showcase native pronunciation, letting students practice listening in authentic contexts daily to build confidence.Good.

Distribution and Accessibility
Distribute the packet via PDF downloads and cloud platforms, ensuring accessibility for all devices. Offer a mobile‑friendly version and provide alt‑text for images. Include a QR code linking to an online repository, allowing quick access for students and teachers alike. Accessible via email or portal, download.